Friday, July 11, 2008

Ettercap

Ettercap is a penetration tester, it has many functions that are fun to play around with. To install it via ports browse over to the dir and install it.

# cd /usr/ports/net-mgmt/ettercap
# make install clean

I built it with the default settings


An example how to run a dns_spoof can be found here

Tuesday, June 24, 2008

Cisco 7940 on Asterisk FreeBSD

After a week of trial an error and reading oh so many guides I have finally managed to get these phones to work. First thing is first to enable the built in tftp server that comes along with FreeBSD.
#nano /etc/inetd.conf
scroll down to where it says tftp and uncomment those two lines by deleting the # at the begining of them. Now save the file. Incase your computer dosn't load inetd on startup do the following.
#nano /etc/rc.conf
and add the following line
inetd_enable="YES"
and save the file, and reboot your computer. Next create the default tftp directory
#mkdir /tftpboot
Next move to the new dir
#cd /tftpboot
I really recommend using this cisco sip firmware, you can get it by using wget
#wget http://www.xs4all.nl/~graver1/cisco/SIP-7960/P0S3-08-8-00.zip
Once its done downloading you need to unzip it.
#unzip P0S3-08-8-00.zip
The zip file contains 5 files
OS79XX.TXT
P003-08-8-00.bin
P003-08-8-00.sbn
P0S3-08-8-00.loads
P0S3-08-8-00.sb2
Next you have to create a SIPDefault.cnf file
#nano SIPDefault.cnf
This is what mine contains.
# Image Versionimage_version: "P0S3-08-8-00"
# Proxy Serverproxy1_address: "TrixboxIpaddress"proxy2_address: ""proxy3_address: ""proxy4_address: ""proxy5_address: ""proxy6_address: ""
# Proxy Server Port (default - 5060)proxy1_port:"5060"proxy2_port:""proxy3_port:""proxy4_port:""proxy5_port:""proxy6_port:""
# Emergency Proxy infoproxy_emergency: "TrixboxIP"proxy_emergency_port: "5060"
# Backup Proxy infoproxy_backup: ""proxy_backup_port: "5060"
# Outbound Proxy infooutbound_proxy: "TrixboxIpaddress"outbound_proxy_port: "5060"
# NAT/Firewall Traversalnat_enable: ""nat_address: ""voip_control_port: "5061"start_media_port: "16384"end_media_port: "32766"nat_received_processing: "0"
# Proxy Registration (0-disable (default), 1-enable)proxy_register: "1"
# Phone Registration Expiration [1-3932100 sec] (Default - 3600)timer_register_expires: "3600"
# Codec for media stream (g711ulaw (default), g711alaw, g729)preferred_codec: "none"
# TOS bits in media stream [0-5] (Default - 5)tos_media: "5"
# Enable VAD (0-disable (default), 1-enable)enable_vad: "1"
# Allow for the bridge on a 3way call to join remaining parties upon hangupcnf_join_enable: "1" ; 0-Disabled, 1-Enabled (default)
# Allow Transfer to be completed while target phone is still ringingsemi_attended_transfer: "0" ; 0-Disabled, 1-Enabled (default)
# Telnet Level (enable or disable the ability to telnet into this phonetelnet_level: "2" ; 0-Disabled (default), 1-Enabled, 2-Privileged
# Inband DTMF Settings (0-disable, 1-enable (default))dtmf_inband: "1"
# Out of band DTMF Settings (none-disable, avt-avt enable (default), avt_always - always avt )dtmf_outofband: "1"
# DTMF dB Level Settings (1-6dB down, 2-3db down, 3-nominal (default), 4-3db up, 5-6dB up)dtmf_db_level: "3"
# SIP Timerstimer_t1: "500" ; Default 500 msectimer_t2: "4000" ; Default 4 secsip_retx: "10" ; Default 11sip_invite_retx: "6" ; Default 7timer_invite_expires: "180" ; Default 180 sec
# Setting for Message speeddial to UOne boxmessages_uri: "*97"
#********* Release 2 new config parameters **********
# TFTP Phone Specific Configuration File Directorytftp_cfg_dir: "./"
# Time Serversntp_mode: "unicast"sntp_server: "time.nist.gov"time_zone: "EST"dst_offset: "1"dst_start_month: "April"dst_start_day: ""dst_start_day_of_week: "Sun"dst_start_week_of_month: "1"dst_start_time: "02"dst_stop_month: "Oct"dst_stop_day: ""dst_stop_day_of_week: "Sunday"dst_stop_week_of_month: "8"dst_stop_time: "2"dst_auto_adjust: "1"
# Do Not Disturb Control (0-off, 1-on, 2-off with no user control, 3-on with no user control)dnd_control: "1" ; Default 0 (Do Not Disturb feature is off)
# Caller ID Blocking (0-disabled, 1-enabled, 2-disabled no user control, 3-enabled no user control)callerid_blocking: "0" ; Default 0 (Disable sending all calls as anonymous)
# Anonymous Call Blocking (0-disbaled, 1-enabled, 2-disabled no user control, 3-enabled no user control)anonymous_call_block: "0" ; Default 0 (Disable blocking of anonymous calls)
# Call Waiting (0-disabled, 1-enabled, 2-disabled with no user control, 3-enabled with no user control)call_waiting: "1" ; Default 1 (Call Waiting enabled)
# DTMF AVT Payload (Dynamic payload range for AVT tones - 96-127)dtmf_avt_payload: "101" ; Default 100
# XML file that specifies the dialplan desireddial_template: "dialplan"
# Network Media Type (auto, full100, full10, half100, half10)network_media_type: "auto"
#Autocompletion During Dial (0-off, 1-on [default])autocomplete: "1"
#Time Format (0-12hr, 1-24hr [default])time_format_24hr: "0"
# URL for external Phone Servicesservices_url: "http://TrixboxIpaddress/cisco/services/index_cisco.php"
# URL for external Directory locationdirectory_url: "http://TrixboxIpaddress/cisco/services/PhoneDirectory.php"
# URL for branding logologo_url: http://TrixboxIpaddress/cisco/bmp/trixbox.bmp


You are also going to need another file called SIPMAC.cnf all letters in the mac address have to be CAPITAL. Here is mine
#nano SIP000C85F059F8.cnf
# Cisco SIP Configuration
phone_label: "Your Name Here"line1_name: "435"line1_shortname: "435"line1_displayname: "435"line1_password: "Pass Removed"line2_name: "335"line2_shortname: "335"line2_displayname: "335"line2_password: "Pass Removed"line3_name: "UNPROVISIONED"line3_shortname: "UNPROVISIONED"line3_displayname: "UNPROVISIONED"line3_password: "UNPROVISIONED"line4_name: "UNPROVISIONED"line4_shortname: "UNPROVISIONED"line4_displayname: "UNPROVISIONED"line4_password: "UNPROVISIONED"line5_name: "UNPROVISIONED"line5_shortname: "UNPROVISIONED"line5_displayname: "UNPROVISIONED"line5_password: "UNPROVISIONED"line6_name: "UNPROVISIONED"line6_shortname: "UNPROVISIONED"line6_displayname: "UNPROVISIONED"line6_password: "UNPROVISIONED"line1_authname: "435"line2_authname: "335"line3_authname: "UNPROVISIONED"line4_authname: "UNPROVISIONED"line5_authname: "UNPROVISIONED"line6_authname: "UNPROVISIONED"


Now it is time to boot the phone I would really recommend reseting it to factory defaults to do this when it powers on the headset light comes on hold down # then when the speaker light goes off put in this key combination 123456789*0# the phone will ask you if you want to reset it press 2 to continue. The phone will boot up three times at most. I had an old version of the firmware for you can see what is going on it will boot mine said
Cisco System Inc 2000-2005
Then its said
Verifying load
Upgrading app
Reboot
Cisco System Inc 2000-2007
Verifying load
Upgrading app
Reboot
Cisco System Inc 2000-2006
Sip
Now your configuration will be loaded.

Tuesday, June 17, 2008

Asterisk

Asterisk is an open source PBX software, it works wonders If you want to use at home or at a small business. I'm trying to convince my place of employment to switch over to Asterisk since they are looking for a new phone setup. I will be using Cisco 7940 phones using the sip protocol. To install Asterisk you need to have source tree installed. The install is straight foward. You change to the asterisk port directory.
#cd /usr/ports/net/asterisk12
#make install clean
I used all the default compile settings.
I launched asterisk to make sure everything was working just fine. I used this following command which will also log you into the asterisk terminal.
#asterisk -vvvvvvvvvvvvvvc
That is 14 v's
Once asterisk was running I installed asterisk-gui.
#cd /usr/ports/www/asterisk-gui
#make install clean
In the compile settings I checked sip and load default config files everything else is default.
No after is done compiling there are some tweaks you have to make to enable it on the conf files.
#cd /usr/local/etc/asterisk
First we are going to edit the manager.conf file
#nano manager.conf
It should read as follows
'displayssystemname = yes
enabled = yes
webenabled = yes
port = 5038
httptimeout = 60
bindaddr = 0.0.0.0'
Save
Next we edit the http.conf file
#nano http.conf
The top portion should be as follows
'enabled=yes
enablestatic=yes
bindaddr=0.0.0.0
bindport=8088'
Save an exit
I have the following at the end of manager.conf for a user names cmclaine it is completley optional but it makes my life easier so I would assume it would do the same for you.
'[cmclaine]
secret=password
permit=10.10.10.197/255.255.255.0
read = system,call,log,verbose,command,agent,config
write = system,call,log,verbose,command,agent,config'
The permit line allows another IP address to connect to the asterisk-gui because by default on localhost can connect to asterisk-gui. You are done configuring asterisk-gui.
I've noticed if you do a reload in asterisk it wont always reload everything so go ahead and reboot your box then you can run asterisk.
#asterisk -vvvvvvvvvvvvvc

Mouse

Several of you emailed me about your mouse not working in X windows there is relatively an easy fix for this. I'm going to assume you are logged in as root on ttyv since your mouse isn't working in X org.
Run the command to detect your mouse, X config has come a long way
#X -configure
Now you should get some output telling you to try it.
#X -config /root/xorg.conf.new
About 90% of the time it will of worked now you just make it the default config file for Xorg.
#cp /root/xorg.conf.new /etc/X11/xorg.conf
Now your mouse will work when you startup Xorg.

Monday, May 12, 2008

Gimp

Gimp is a great open source replacement for photoshop. It has allot of features but not as many as photoshop. You can fix red eye do layer transparency, it is a great product for being free and it is very light weight also. Another simple program to install you browse to the port folder.
#cd /usr/ports/graphics/gimp
#make install clean
You can't tell me you, you aren't liking how simple FreeBSD is.

Libraries

Well I've read about people having this problem in forums. They can't get stuff like firefox mplayer gio-fam-backend to compile through ports. This is pretty easy to fix, it's because FreeBSD 7.0 installs an old version of glib. It's relatively simple to correct just browse over to the glib20 folder
#cd /usr/ports/devel/glib20
#make deinstall
Now the old version is uninstalled and now all you have to do is install the new version.
#make install clean
Now you can compile till your little heart is content, now wasn't that easy?

Installing FreeBSD

Realistically this should have been my first post, but I started with a preconfigured box. The first time I installed FreeBSD a couple years ago it took me two days to learn how to configure everything the way I wanted. Since the FreeBSD has becoming allot easier to me anyways. My roommate tried installing FBSD and failed miserably and I had it up and running in 10min. For this example I will be using FreeBSD 7.0 release version. When you boot of the disc it will ask you what country you are in. If you don't know the answer to this then you probably shouldn't be installing FreeBSD. Once you choose you country you will be prompted with the main menu.

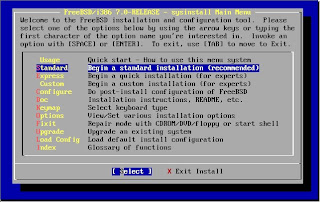
I start off by choosing standard, once you choose it you will be prompted by an fdisk message. Press enter to continue. Now at the fdisk partition editor (I'm going to assume you have a blank drive.) Press A to use Entire disk for the editor looks something like this.
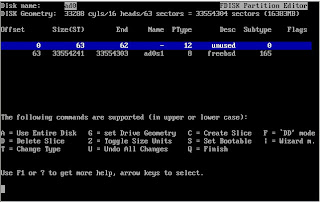
Press Q to exit the fdisk manager. For the Boot manager I select "Install the FreeBSD Boot Manager" and press ok. Now you will need to create BSD partitions inside of the fdisk partition. Press OK. Press A to auto partition it and it will look something like this
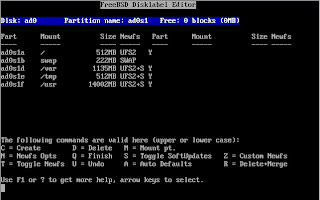
Press Q to exit the partioner and move on to Distributions.
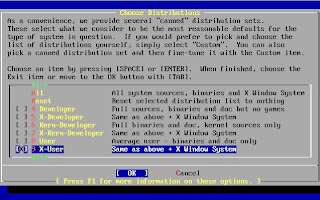
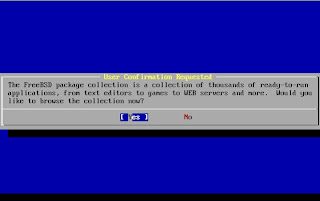
I choose X-User to make life simple it the easiest time now to install Xorg. So once you choose what you want scroll up and hit exit. You will now be prompted for Instillation media, I always use FTP I find it quicker. Once you choose your instillation media click yes on the User Confirmation Request to start the install.When its done installing you will be prompted with a Congratulations Box, click OK.
Now you will get a couple boxes asking questions, I say no to all of them except SSH login, time zone and linux binary.
“Do you want this machine to function as a network gateway?”
“Do you want to configure inetd and the network services that it provides?”
“Would you like to enable ssh login?”
“Do you want to have anonymous FTP access to this machine?”
“Do you want to configure this machine as an NFS server?”
“Do you want to configure this machine as an NFS client?”
“Would you like to customize your system console settings?”
“Would u like to set this machines time zone now?”
“Would you like enable linux binary compatability?”
“Does this system, have a PS/2, serial, or bus mouse?”
Now you will be prompted if you want to install any ports select yes.
Feel free to install any ports you want, I only install KDE for I have a good gui to go on. So you would scroll down to kde and press enter. 
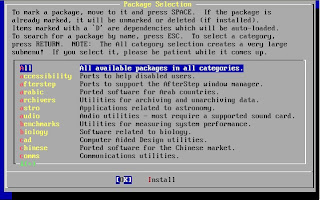
I just install bare kde-3 I scroll down and select kde-3.5.8 and it will automatically check all the dependencies that are required as well. So you just check OK and you will go back to the previous menu and select Install.When FreeBSD is done installing it will ask you if you want to seyup a user account select yes and name it what you want. Be sure to put the user account in the wheel group this is what will allow your user account to perform su requests which are veryhelpful especially if you are installing somehting through ssh, by default root account can not log on to an ssh session.

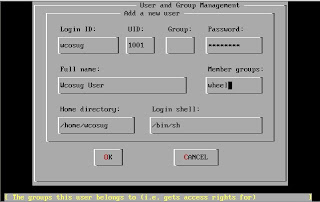
After your user account is settup press OK and you will be prompted to make a root password, after that is done you will get a prompt asking if you want to Visit the general configuration menu for a chance to set any last options. I click no then Exit and reboot. Now you have a FreeBSD box that runs KDE and ssh. Good luck!